

How To Set Up A Drum Set
Drums can be a daunting instrument if you've never played a set before. Other instruments similar guitars and keyboards are fairly simple to plug in and go playing whereas drum kits have several components to set up.
All the components work in conjunction and each one is as of import every bit the other. So, it's vital that you set up the pulsate kit upward properly. If you demand to know how to prepare a drum set, wait no further than this guide.
Unboxing
I've always told all my students that unboxing your gear up is both the virtually terrifying and wonderful part of the whole process. It'south terrifying considering it tin can go pretty overwhelming to see all these metal parts that you don't know what to practice with. It's wonderful because it's the first stride of setting upwardly your drumming journey.
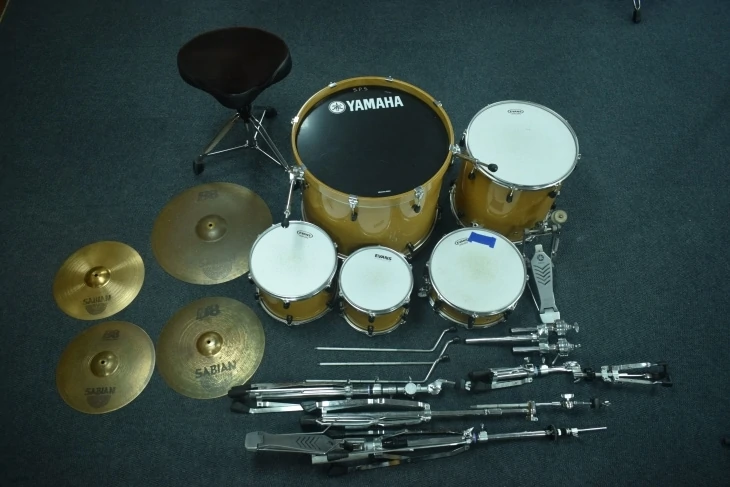
If you're feeling overwhelmed, merely make sure to divide the drums from the hardware. One time that is done, it'll exist a flake easier to run into what goes where. I'd suggest you don't worry too much about setting anything up at this stage. Only make certain that you take all the parts you need. There should be a checklist that comes with virtually boxes of drums.
If you've bought a brand new drum prepare, information technology's well-nigh probably come up to you lot in tightly sealed boxes. To fit the drums in these boxes, companies will strip the shells downwards to fit them comfortably in the packaging. The first pace would be to unbox the kit and separate all the shells, cymbals, and hardware.
Drum heads and pulsate rims typically won't exist attached to the drum shells in the boxes. Yous're going to need to put them together.
To practise this, find all the heads and rims that fit with the relevant shells and use a drum key to adhere the drum head to each shell. Once yous've attached all the drum heads, you'll need to tune them. Nevertheless, we'll get to that part subsequently.
The side by side step is to unpack all the hardware and cymbals and identify them in an organized fashion so that it will be easy to access them when you need to. Think of setting up a drum kit the same way you lot'd build LEGO.
In that location may be some modest screws and knobs lying effectually. These will most probably be used to connect small hardware parts to the pulsate shells.
Not all drum kits come up in sealed boxes. If you buy a kit at a music store, they may just pack the kit into your car in all its pieces that are already ready. This eliminates the unboxing process and makes setting up a lot easier for beginners.
Hardware
Hardware refers to all the metal parts that agree the drums and cymbals together. This means anything that looks like a stand and anything that holds toms in place. The hardware would have come in small deconstructed pieces in the box. Find all those pieces and go ready to connect their parts together.
The main pieces of hardware you'll accept are a hi-lid stand, crash cymbal stand up, ride cymbal stand, snare stand, and pulsate throne. Some kits will come up with more than cymbal stands, assuasive you to mount more cymbals.
Cymbal stands are fairly straightforward to figure out. Yous need to open up the tripod legs and and then raise each department of the stand. This will piece of work the same for the crash and ride cymbal stands.
If they are straight stands, that's all you need to do. If they are nail stands, there'll exist an extra arm that you need to connect to the summit.
The hi-hat stand is the most confusing piece of hardware to work with. Information technology's the stand up that has a pedal between the iii legs. There will exist a brusk and thin rod that you need to screw into the top of the hi-chapeau stand up. This rod will exist raised up and down with the use of the pedal.
Next, set upward the snare pulsate stand. It's the small stand with a claw-like clamp that holds the snare pulsate. To set it upwards, y'all just need to open the legs and open up up the claws. You can tweak information technology later when putting the snare pulsate on it.
My number one piece of advice would be to raise all the stands to shoulder pinnacle when you're sitting on the drum throne. This may seem a bit high for your cymbals. However, I suggest you do this as it's easier to lower the stands in one case they have cymbals on than it is to enhance them.
And so, shoulder height is a expert position to start with when placing the stands around the drums. Just make sure to practice this with only the cymbal stands. The snare stand will need to be the height of your knees.
Finally, the drum throne is the thing that you sit on when playing drums. It will be the small stand with thick legs. There should be a seat that y'all attach to the stand. Attach it and you'll be ready to start playing. It may be better to set this upwardly first so that you take somewhere to sit when setting upwards the rest of the kit.
Once y'all've got all the hardware ready, you can move onto the drums.
Drums

Moving onto the stars of the show, the drums themselves. Since you lot've already connected all the drum heads and rims, you but demand to identify them.
Before placing the cymbal stands around the drums, I always encourage my students to play effectually on the drums to make certain that they're feeling comfortable. Yous should do this equally it volition allow you to experience if certain drums are too far away from each other. It'due south ever meliorate to position the drums comfortably earlier you set the cymbals upwardly.
You lot could even play a few beats. Encounter what yous can come up with without having the hi-lid or ride cymbal. It will be harder than you lot think.
The get-go place to first will always be the bass drum. This is the biggest drum in the set up. Place it on the floor in front of the pulsate throne. Make sure you accept a practiced amount of infinite betwixt you lot and the bass drum.
Get the pedal that came with the kit and attach it to the front of the bass drum. Pulsate pedals can go quite catchy to set up, but most basic ones are piece of cake to just attach. If you want to modify the tension of the pedal, there will exist a spring that y'all tin tighten somewhere near the base of information technology.
Place the snare drum stand that y'all fix earlier to the left of the bass drum pedal. It should stay close to your torso but leave enough space for your legs to movement comfortably.
Now, place the snare drum firmly in the claws of the stand. If you're non sure which drum the snare is, it'southward the shallow one that has snare wires on the bottom. With your bass drum and snare drum set up up, y'all're ready to place the rest of the kit around them.
The toms will mount to the bass drum with the use of tom artillery. These are small pieces of hardware. Mountain the smallest tom just above the snare pulsate and the middle-sized tom to the right of the smallest tom.
These are called your hi tom and centre tom. Find the sparse metallic legs and attach them to the floor tom. Place this tom to the right of the bass drum pedal.
Make sure that all the drums are placed close to each other. If they're placed likewise far away, you're going to use too much energy when playing. The closer they are, the easier it will be to play from drum to pulsate.
Cymbals

The final pieces of equipment to fix are the cymbals. A good way to plan their setup is to go around the drum kit. So, the first thing to do would be to gear up the hi-hats. Become the hi-chapeau stand you lot fix before and identify the lesser hat on the stand facing upwardly.
Now, connect the included hi-lid clutch to the acme chapeau. Once you've washed that, put the tiptop hat on the stand facing downwards. Printing the pedal down and tighten the clutch so that in that location's a pocket-size gap when you lot raise the pedal. Place the hi-hat to the right of the snare drum.
Get one of the cymbal stands and attach the crash cymbal to it. To attach it, you demand to loosen the wing nut and take it off along with i of the cymbal felts.
Place the crash cymbal on the stand and make sure at that place's another cymbal felt on the bottom of information technology. In one case you've done this, place the first cymbal felt on top and so tighten the wing nut.
Repeat this procedure with the ride cymbal. Crash cymbals are typically placed to the left of the hi tom while ride cymbals are placed to the right of the flooring tom. Place the cymbal stands there and make sure you can comfortably attain the cymbals when playing.
Remember how I said to identify the cymbals at shoulder acme? Now is the time to drib them to a elevation that is comfortable while not getting in the way of the drums. Some drummers like to position their cymbals incredibly high up. However, I wouldn't advise doing that.
It'southward a expect that was popular during the 80s and 90s. Modern drummers take stopped doing it, and there's a very good reason for information technology. The higher your cymbal stands are, the more tension y'all're going to exist putting on your shoulders.
I experienced this personally when a md told me I was straining my rotator cuffs from drumming. I knew immediately that information technology was because I was reaching as well loftier to play the cymbals. So, the lower your cymbals are, the improve information technology is ergonomically. Only don't place them besides low!
Tuning

Afterward y'all're done setting up your kit, it'll all the same require tuning before you can kickoff playing. Most drum kits come with a pulsate tuning key, so yous'll need to make use of it to get the drums to sound ameliorate. You lot can also use a dedicated digital or analog drum tuner to make this process easier for you.
Each drum needs to be tuned slightly differently to reach a variety of sounds. However, the basic idea is to turn all the lugs of the pulsate with the key until the pulsate head tightens. Tightening the heads will increase the pitch of their sound.
To go the unabridged pulsate kit in tune, y'all need to achieve similar tension levels beyond all the drums.
Tuning is a skill that takes years to develop. Another way to make the drums sound a scrap better is to use muffling. This is when y'all put things on the drums to lower their sustain. A skillful place to beginning would exist to merely employ some record. Information technology will brand an immediate deviation.
If this is your outset drum kit, I strongly suggest that you resort to muffling first before attempting to melody the drums flawlessly. Tuning is something that I still struggle with even though I've been playing drums for years.
If the drum kit y'all have cost anywhere from $100 to $500, then muffling will e'er be the best option to go with before tuning. Drums in that toll range generally don't tune very well with the stock heads they come up with.
Conclusion
Near drum kit setups are pretty standard. However, you'll first to develop your ain voice on the kit over time and in plow will get-go altering how your drums are set up.
Some drummers volition have x rack toms while others won't have any. It's part of the journeying of finding yourself equally a musician.
It all starts with the setting up of your first drum kit. So, follow these instructions advisedly and get to it. Playing drums is a great thing to do. Don't let the fright of having to set a pulsate kit up stop y'all from doing it.
Source: https://musicstrive.com/set-up-drum-set/
0 Response to "How To Set Up A Drum Set"
Post a Comment